

How to Change URL Without Losing SEO
- Jan 9, 2022
- 4 min read
Whether you're updating content on your existing site or moving your entire site to another domain name, you might be wondering how to change URL without losing SEO. When you spend a long time optimizing your site and gaining trust and authority to Google, you definitely don't want to lose your current search engine rankings!
So, how do you change your URLs without losing SEO? The most effective way to do this is with 301 redirects. This will allow all of the traffic and SEO to be redirected from the old URL to the new URL.
Some website platforms already have this ability to set up 301 redirects built into the site (such as Wix) and others require you to install an additional app or plugin (such as WordPress).
Lets talk about why it's important to use 301 redirects and how to set them up on some of the most popular website platforms.
Table of Contents

Why are 301 redirects important for SEO?
When you change the URL of a page that is already published on the internet, the old URL will display a 404 error. If this is not changed, Google will display an Index Coverage Error like this:
Submitted URL not found (404): You submitted a non-existent URL for indexing.
How does this affect your SEO? Well, obviously, if that old URL is ranking on Google, the page will display a 404 error and not the content that you want Google to crawl. Eventually, when Google crawls the site again, they will go to that link and see that there is no relevant content on the page and the URL will be deindexed. Your search rankings and hard work will be lost and you'll have to start over.
This also applies to any backlinks that you might have from other websites. There is no way that you will be able to contact all of the site owners who link to your site and ask them to update the URL. However, with a 301 redirect, it doesn't matter. They can keep the old URL but when someone clicks on it, they will automatically be redirected to the new URL with the correct page content.
Another time this will become handy is if you change your domain name. When changing the domain name on your site, all of the slugs (or portion of the url that comes after the .com) will remain the same but you'll need to update all links to redirect to the new domain name.
How to Setup a 301 Redirect on Wix
Wix makes it so easy to set up a redirect. There is no need to install a separate app or plugin, everything is already built in. All you need is a domain name and a premium plan (you cannot set up redirects with a free Wix URL).
When I moved my website (this one) from WordPress to Wix, I set up 301 redirects for all of my blog posts. I changed the blog URL structure and didn't want to lose my currently rankings. I found that not only did my rankings remain the same, I actually increased in rankings on some of the poorer performing blog posts. This is a win!
Wix makes setting up 301 redirects super simple:
Go to SEO Tools in your site's dashboard.
Click URL Redirect Manager.
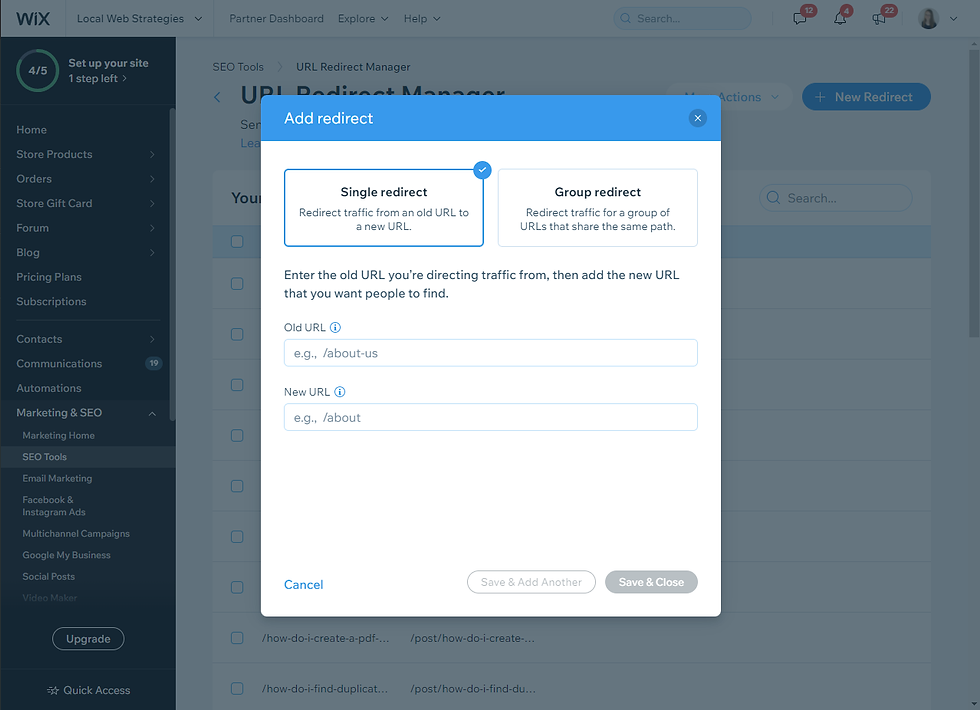
Click + New Redirect.
Select Single Redirect. Note: If you want to update multiple pages which share the same path, you can select group redirect. Learn More
Enter the old URL path you want to redirect from, (e.g., /about-us) under Old URL.
Start typing the URL path of your new page and select it from the drop-down.
Click Save & Close or click Save & Add Another to add more.
Get the full support article here.
How to Setup a 301 Redirect on WordPress
Setting up a redirect on WordPress takes a little more effort since you need to find a reliable plugin and set it up first.
A premium option is to upgrade your current SEO tool, which will often include a redirect manager as part of their premium plan. Two of my favorite SEO Plugins that include this with premium are Yoast SEO and All-in-One SEO. I have successfully ranks WordPress website with both plugins and find them to be easy to use. I do not pay for the premium plan for either, but I like that I could reduce the number of plugins I use by upgrading. Right now I have to install another plugin to do the redirects.

If you don't want to pay for a premium plugin, like me, I recommend using Redirection by John Godley. I have successfully used this free plugin on many sites without any problems. The plugin has 4.5 stars with 571 ratings.
One of the things that I really like about this plugin is that it allows you to see how many hits the URL has gotten with the redirect.

How to Setup a 301 Redirect on Squarespace & Shopify
Full disclosure: I have never setup redirects on Squarespace or Shopify, but if you're looking for instructions on how to do it, this might help.
Squarespace - full instructions here
In the Home menu, click Settings, then click Advanced.
Click URL mappings.
Click into the text field and add your redirects. Ensure the formatting is correct.
Click Save.
Shopify - full instructions here
From your Shopify admin, go to Online Store > Navigation.
Click URL Redirects.
Click Create URL redirect.
In Redirect from, enter the old URL that you want to redirect visitors from. You can't redirect URLs that begin with the following prefixes: /apps, /application, /cart, /carts, /orders, /shop, or /services.
In Redirect to, enter the new URL that you want to redirect visitors to. If you want to redirect to your store's home page, then enter /.
Click Save redirect.
Keep Your SEO in Tact with 301 Redirects!
I hope that know you understand how and why you should always set up 301 redirects when you're changing any of your website URLs. Don't lose all of your hard work and effort, let along the website traffic and visitors, just by missing a simple step like this.
If you have any questions or comments about this topic, please leave a comment below!


link link link link link link link link link link link link link link link link link link link link link link link link link link link link link link link link link link link link link link link link link link link link link link link link link link link link link link link link link link link link link link link link link link link link link link link link link link link link link link link link link link link link link link link link link link link link link link link link link link link link link link link link link link link link link link link link link link link link